
 07584 319522
How to Pressure Wash a Driveway Without Causing Damage
Last Updated: November 2, 2026
Quick Summary
To learn how to pressure wash a driveway without damage, use a rotary surface cleaner or a 25-degree fan spray, keep the lance moving in overlapping passes and never use a 0-degree pinpoint tip. Hold the nozzle at least 300 mm from the paving, protect the jointing sand and re-sand once the surface is fully dry.
- Use a 40-degree tip on delicate or older paving surfaces.
- Test a small hidden area first on older or sealed paving.
- Let the driveway dry for 24 to 48 hours before re-sanding.
- Fill joints to about 3 mm below the block surface with kiln-dried sand.
- Avoid washing the drive for at least a week after re-sanding.
Table of Contents
- What You Need Before You Pressure Wash a Driveway
- How to Clean Block Paving with a Pressure Washer
- The Best Pressure Washer for Driveways: What to Look For
- Step-by-Step Pressure Washing Process
- How Often to Pressure Wash a Driveway
- Aftercare: Re-sanding, Sealing and Preventing Regrowth
- When to Call a Professional Driveway Cleaning Service
- Frequently Asked Questions
What You Need Before You Pressure Wash a Driveway
Knowing how to pressure wash a driveway is the fastest way to strip years of grime, moss and tyre marks from block paving. But the wrong kit or setting can etch the surface and wash out jointing sand. At JAG Simply Clean, we have spent over 20 years cleaning exteriors, and the jobs that go wrong almost always skip the setup stage.
Get the basics right and the rest is straightforward. Here is what you need before you start.
Essential equipment and nozzle selection
You need a pressure washer, a surface cleaner attachment, the right nozzle tip and a supply of kiln-dried sand. A rotary surface cleaner gives an even finish on block paving and stops the streaking you get from a hand-held lance.
Nozzle choice matters more than most people think:
- 25-degree fan spray for general cleaning on paving
- 40-degree tip for delicate or older surfaces
- Never a 0-degree pinpoint tip on a driveway, as it can gouge the blocks
Check the flow rate on your machine too. A higher flow rate rinses debris faster than raw pressure alone.
Safety gear and surface preparation
Put your safety goggles and protective footwear on before you touch the trigger. A pressure washer throws grit and dirty water at speed.
Then clear the area:
- Move cars, bins and planters off the driveway
- Sweep up loose debris and leaves
- Pull weeds from the joints
Watch out: blasting over an already damaged block will widen the crack and can lift the block entirely.
How to Clean Block Paving with a Pressure Washer
Cleaning block paving is mostly about restraint. The blocks themselves handle pressure well. The jointing sand between them does not.
Work in sections, keep the lance moving and hold the nozzle at a consistent distance. A steady, overlapping pass beats a slow, concentrated blast every time.
Protecting jointing sand and avoiding etching
Jointing sand is what locks block paving together. Blast it out and the blocks shift, weeds take hold and water pools in the gaps.
To protect it:
- Use a fan spray, never a pinpoint jet
- Keep the nozzle angled, not pointed straight down into the joints
- Accept that some sand will come out and plan to re-sand afterwards
Etching shows up as pale, dull patches where the top layer has been stripped. It happens when you hold the nozzle too close or use too much water pressure on a soft surface. Once etched, a block cannot be polished back.
The Best Pressure Washer for Driveways: What to Look For
The best pressure washer for driveways balances water pressure with flow rate. For block paving, look for a machine in the mid range with a rotary surface cleaner attachment, not the most powerful unit on the shelf.
Here is what actually matters:
| Feature | What to Look For | Why It Matters |
|---|---|---|
| Water pressure | Mid-range, adjustable | Enough to clean without etching |
| Flow rate | Higher is better | Rinses debris faster |
| Nozzle tips | Full set included | Fan spray for paving |
| Surface cleaner | Compatible attachment | Even finish, no streaks |
| Portability | Wheels and a long hose | Easier to work a large drive |
Adjustable pressure is the feature most buyers overlook. Being able to dial it down for a delicate patio and up for a grimy driveway saves you buying two machines.
Step-by-Step Pressure Washing Process
Here is the full process, start to finish, with the detail that separates a clean that lasts from one that comes back within weeks.
- Clear and sweep the driveway of all debris. Pay particular attention to the joints, where grit and leaf litter compact and hold moisture against the blocks.
- Pre-treat stubborn marks with a detergent or degreaser. Apply to oil, rust and organic staining first, then leave it to dwell for the time stated on the label, typically five to ten minutes for a domestic degreaser. Do not let it dry on the surface.
- Test a small area in a corner or behind a bin store to check the pressure setting and nozzle choice before you commit to the whole drive.
- Wash in sections with a fan spray or surface cleaner, keeping the lance moving. Work in overlapping passes of about 50 per cent so you do not leave stripes between clean and dirty bands.
- Work top to bottom so dirty water runs away from clean paving, and start at the furthest point from the drain so you are not walking back through the runoff.
- Rinse thoroughly to remove all detergent residue. A second, low-pressure pass with clean water is usually enough; a surface cleaner with the detergent bottle removed works well for this.
- Let it dry fully before re-sanding. In cool, damp weather this can take 24 to 48 hours, and sand brushed into damp joints will clump and fail to settle.
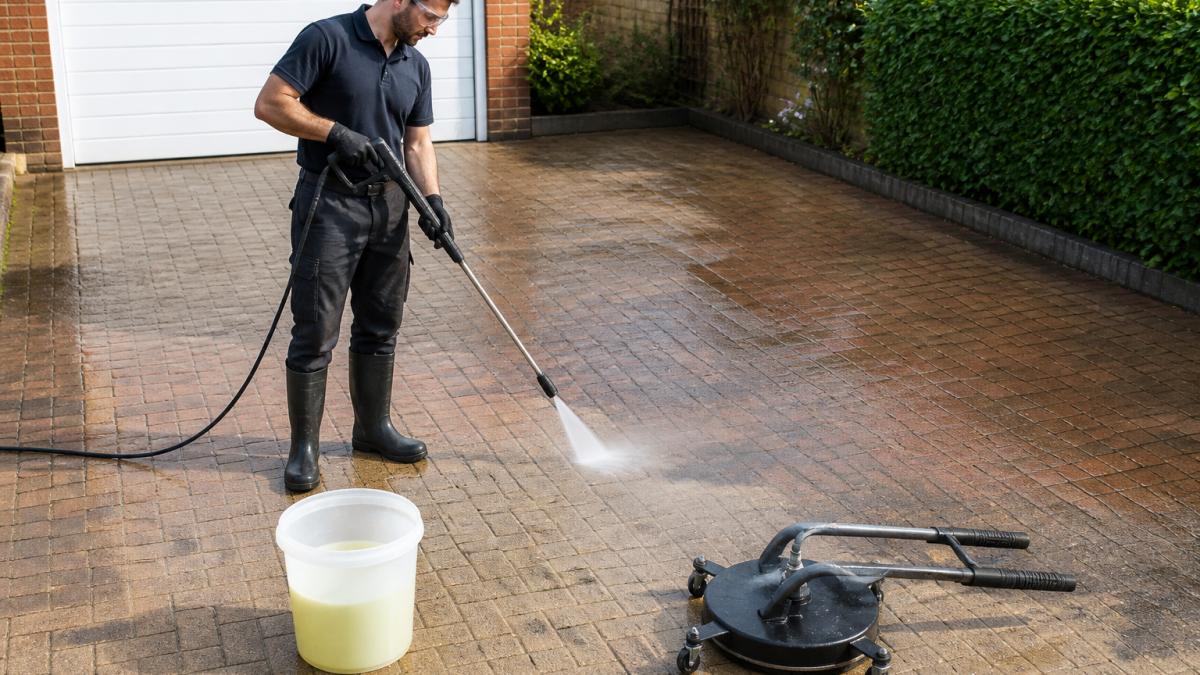
Applying detergent and tackling oil stains
Detergent does the heavy lifting on oil stains and ground-in dirt. Apply it first, let it dwell for the time stated on the label, then wash it off. A common pattern is to apply neat degreaser to oil spots, agitate with a stiff brush, and then wash the whole area with a diluted mix through the pressure washer’s detergent pick-up.
For oil stains:
- Apply a dedicated degreaser, not washing-up liquid, which leaves a film that attracts dirt
- Give it time to break down the oil, fresh oil lifts in minutes, old oil can need repeat applications
- Agitate with a stiff brush on bad marks, working along the joints rather than across them
Watch out: never let detergent dry on the paving. It leaves a residue that attracts new dirt and can leave pale tide marks on darker blocks.
Rinsing and managing runoff
Rinse from the top of the drive downwards so dirty water flows away from what you have already cleaned. Use low pressure for the rinse so you do not drive water deeper into the joints you have just cleaned.
Runoff is the part most guides ignore. Dirty water carrying detergent, oil and moss should not run straight into a drain or a neighbour’s garden.
Troubleshooting common mistakes
Most DIY pressure washing problems fall into a few recognisable patterns:
- Streaking, caused by moving the lance too slowly or using a pinpoint jet. Re-wash the area with a fan spray and overlapping passes; do not try to spot-clean the stripe.
- Etching, pale, dull patches where the surface has been stripped. This happens when the nozzle is held too close or pressure is too high on a soft or sealed surface. Etching cannot be polished out, so test first and keep the nozzle at least 300 mm from the paving.
- Blown joints, jointing sand washed out in channels. Stop, let the area dry, and re-sand before continuing; washing over a blown joint widens it.
If you want a broader primer on how the equipment works, our guide to pressure washing covers the fundamentals before you begin.
How Often to Pressure Wash a Driveway
Most driveways need pressure washing once or twice a year. A shaded, north-facing drive that stays damp will need it more often than a sunny one.
Signs it is time:
- Green algae or black spots appearing on the blocks
- Moss creeping into the joints
- Weeds pushing through
Regular cleaning also lets you spot cracks and loose blocks early, before they turn into a repair job.
Aftercare: Re-sanding, Sealing and Preventing Regrowth
Re-sanding is not optional. Once the paving is dry, brush kiln-dried sand into the joints and sweep off the excess. This locks the blocks and blocks weeds from taking hold. Most guides mention kiln-dried sand without explaining why it matters: ordinary builder’s sand holds moisture, compacts poorly and encourages moss, while kiln-dried sand is dried and graded so it flows into the joint and sets firm without shrinking.
Re-sanding block paving correctly
- Wait until the paving is fully dry, 24 to 48 hours in good weather
- Use kiln-dried sand, not building sand or sharp sand
- Pour a small pile and work it into the joints with a soft brush, sweeping diagonally across the paving rather than along the joints
Watch out: if the joints are deeper than about 10 mm, the sand will not bridge properly and the blocks will rock. In that case, lift and re-lay the affected blocks rather than trying to fill a deep void with sand.
Sealing and preventing regrowth
Sealing can help slow regrowth between cleans, though the frequency depends on the surface and conditions.
Apply sealer only to clean, dry paving, and only when rain is not forecast for 24 hours. Two thin coats are better than one thick coat, which can pool in the joints and leave a patchy finish.
For regrowth between cleans, a stiff brush and a targeted moss treatment on the joints will keep on top of it without another full wash. If you have decking nearby, our transformative decking cleaning uses a powerful pressure wash to get your garden in the best condition possible.
When to Call a Professional Driveway Cleaning Service
Some jobs are worth handing off. Large drives, delicate surfaces, stubborn oil stains and any paving you are not sure about are all good reasons to bring in a professional.
A professional clean can help with correct pressure settings for your surface and with the aftercare that DIY jobs often miss. You can also check the availability of driveway cleaning in Milton Keynes before you book.
If you would rather not spend a weekend wrestling a pressure washer, you can call us to book your clean.
Pressure washing a driveway yourself is doable, but the damage from a wrong setting lasts far longer than the clean.
Frequently Asked Questions
What pressure should I use to clean a driveway?
For most block paving and concrete driveways, keep the pressure washer between 1,500 and 2,500 PSI. Start at the lower end and test on a small hidden area first. Higher pressure risks stripping jointing sand, etching concrete and damaging block surfaces. Always use a fan spray nozzle (25 or 40 degree) rather than a pinpoint jet, and hold the wand at a consistent distance of about 30 cm from the surface.
How do you pressure wash block paving without removing the jointing sand?
Use a lower pressure setting (around 1,500 PSI), a wide fan nozzle and a surface cleaner attachment to spread the force evenly. Keep the wand moving and avoid dwelling on joints. After washing, you will almost certainly need to re-sand the joints with kiln-dried sand. Work in dry conditions and brush the sand into the joints before sealing. If the sand is already loose, consider raking it out first and replacing it after cleaning.
Should I use detergent when pressure washing a driveway?
Yes, for most driveways a suitable detergent helps break down oil, algae and general grime, reducing the amount of pressure needed. Use a driveway-specific cleaner or a mild degreaser, apply it with a low-pressure foam lance, let it dwell for the recommended time (usually 5-10 minutes) and then rinse thoroughly. Avoid harsh bleach-based products near plants and pets, and always follow the manufacturer’s dilution ratios.
How often should I pressure wash my driveway?
Most driveways benefit from a pressure wash every 12 to 18 months. High-traffic or shaded areas prone to moss and algae may need cleaning every 6 to 12 months. If you notice green growth, oil stains or sand loss, clean sooner. Regular maintenance, including re-sanding and sealing, extends the interval between washes and protects the surface.
What should I do after pressure washing a driveway?
Once the driveway is dry, inspect for any damage or loose blocks. Re-sand the joints with kiln-dried sand, brushing it into the gaps. Consider applying a suitable sealant to protect against stains and weed growth. Clear any debris from drainage channels and check that water runs off freely. Avoid parking on the driveway for at least 24 hours after sealing.


